Here are all the parts that come with the Oscillating (Motorized) Blower Stand ("stand").

The following pictures help to show how the pieces can be put together. First, there are two possible ways to assemble the stand, depending on how it is to be used.
Configuration #1 is the simplest assembly but least adjustable as only the height can be raised or lowered. Simply screw the white motor unit onto the top of the tripod, then screw the blower clamp onto the connector on top of the white motor unit. This configuration works well if blowing the spine of someone that is laying on their side on a massage table.


In this picture you can see that it blows only horizontally, left and right. The height of the tripod stand puts this blower at about 39 inches above the floor, at its lowest setting, thus requiring the recipient of a treatment with this blower to be laying on a massage table on their side, so as to be high enough for the blower to blow properly on their spine.
Configuration #2 is a little more complicated but much more adjustable as it uses one of the included ball joints to allow the white motorized unit to be tilted anywhere between 0 and 90 degrees (with 90 degrees being completely to one side).

This picture shows the white motor unit at about a 45 degree angle with the blower holder adjusted a bit to allow the blower to be angled more downwards. With the blower in this position and the tripod extended a bit to raise the blower, the blower can be made to blow (at a slight angle) on someone from head to toe as they lie face down on a bed. This kind of adjustability is what makes this blower stand useful in many different situations.

With the white motor unit tilted completely to one side (a full 90 degree angle), the blower can then be used to blow up and down someone's spine as they sit on a chair, as shown in this picture:

PLEASE NOTE: The motor unit and blower together can be quite heavy when tilted over in a 90 degree position as shown above. When using the blower this way, position motor unit and blower directly over one of the 3 legs of the tripod in order to maintain the best possible stability!
TIP: Use a chair that swivels, one with no arms is best, so that the user can swivel left or right to blow on areas to either side of the spine.
NOW, let's look at how to assemble the unit in this configuration (Configuration #2). The following pictures help to illustrate which pieces to assemble together, step by step.
First, you would screw one of the ball joints onto the top of the tripod as shown in the images below.

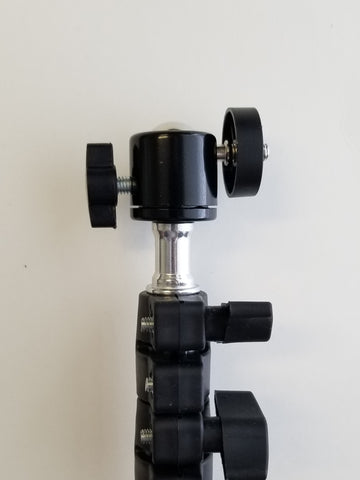
Note that the ball joint in these pictures has already been adjusted so that the part that would screw into the bottom of the white motor unit is tilted to the side (down into the slot on the side of the casing).
Next, screw the ball joint to the bottom of the white motor unit (by rotation the white motor unit onto the threads of the ball joint):

and the top of the white motor unit into the blower clamp (by rotating the blower clamp onto the threads of the connector on top of the white motor unit):

so it all ends up looking like this:

Lastly, you'll plug the cord into the white motor unit and then into the wall or a power strip. NOTE: This white motor unit operates on 110V power.
With the white motor unit plugged into the wall or power strip, press the red button next to the plug on the white motor unit to power the unit and see how it moves back and forth between existing tabs.
This next picture shows the moveable tabs on either side of the direction switch:

These moveable tabs can be pulled out of their slot, then moved left or right into another slot in order to shorten or lengthen the range of motion.
One other part that makes this stand more useful is the remote that comes with it. This remote really has only one useful button, the one without any English numbers, as shown below:

This button can be pressed while the motor is running, to stop movement and to start it again. The red power button on white motor unit must be pressed to turn it on, then the button on the remote can be used to stop and restart the movement. This allows the user to pause movement so that the blower can blow constantly on a single area of the body for as long as the user desires.
Well, that is all there is to this configuration of the stand. ENJOY!